
Part of customizing Magento is, of course, creating custom Modules. These allow you to inject functionality anywhere, whether in a “static” block fashion that’s more than static, or a shipping/payment module, or large module to do something as large as integrating a 3rd party system (or multiple systems).
There are many things custom Modules can do, from editing your Database, to handling module upgrades to overriding classes (Blocks, Controllers, Models) … and more!
Note - All of your customizations need to go into the [root]\app\code\local folder. This is where Magento expects to find them and it’s also a factor in maintaining your upgrade path. When the next version of Magento is released you’ll be able to backup your “local” folder and blow away everything else.
Before we get too far into this let’s setup our development environment, go to:
Admin -> System -> Cache Management: Cache Control – All Cache = Disable (This will save you many hours of self-torture while you’re developing.)
Magento is now correctly configured for development so let’s dive into building a custom module.
This blog post is a very basic start on creating your own custom module and hooking it up to a phtml file in your own theme.
I will be creating a Iyngaran HelloWorld module. ‘Iyngaran’ is the namespace, ‘HelloWorld’ is the module.
Sample file structure:
[root]\app\code\local\{Namespace}\{Modulename}
[root]\app\code\local\{Namespace}\{Modulename}\controllers
[root]\app\code\local\{Namespace}\{Modulename}\etc
[root]\app\code\local\{Namespace}\{Modulename}\etc\config.xml
[root]\app\code\local\{Namespace}\{Modulename}\Helper
[root]\app\code\local\{Namespace}\{Modulename}\Model
[root]\app\code\local\{Namespace}\{Modulename}\{Modulename}.php
{Namespace} is a user defined variable. Basically it’s just a mechanism that allows the user to create disparate classes that would otherwise have the same names.
{Modulename} this is the name of your module.
Controllers is where all the controllers go.
Model holds all of the models for your module.
For my examples I’m going to use “Iyngaran” as my namespace and “Helloworld” as my Module. I’m not entirely sure if it matters or not, but as a general rule I always capitalize the first letter and leave the rest lower case.
Step One
Inform Magento that you have a custom module. Note the file locations (need to create directories as necessary).
app/etc/modules/Iyngaran_HelloWorld.xml
<?xml version=”1.0″?>
<config>
<modules>
<Iyngaran_HelloWorld>
<active>true</active>
<codePool>local</codePool>
</Iyngaran_HelloWorld>
</modules>
</config>
I have informed Magento that I have an active module (you can turn it off from here by setting ‘active’ to false. I have also informed Magento that it is located in the ‘local’ code pool.
Step Two
Configure your new module. Note the file locations (need to create directories as necessary).
app/code/local/Iyngaran/HelloWorld/etc/config.xml
<?xml version=”1.0″?>
<config>
<global>
<modules>
<iyngaran_helloworld>
<version>0.1.0</version>
</iyngaran_helloworld>
</modules>
<blocks>
<helloworld>
<rewrite>
<helloworld>Iyngaran_HelloWorld_Block_HelloWorld</helloworld>
</rewrite>
</helloworld>
</blocks>
</global>
<frontend>
<routers>
<helloworld>
<use>standard</use>
<args>
<module>Iyngaran_HelloWorld</module>
<frontName>helloworld</frontName>
</args>
</helloworld>
</routers>
<layout>
<updates>
<helloworld>
<file>helloworld.xml</file>
</helloworld>
</updates>
</layout>
</frontend>
</config>
I have informed Magento of my module version (it’s an arbitrary version). Version matters when you set up your module to be update-able. (A newer version will inform Magento to run the update files if you have them).
I have also informed Magento that my module contains block files which are found in Iyngaran/HelloWorld/Block. My class name will have “Iyngaran_HelloWorld_Block”. If you want to see the many possibilities of stuff that goes in here, check out Mage config files (such as Catalog/etc/config.xml). You’ll also see other xml files in there.
Step Three
Here is my block code. It doesn’t really do anything, but shows some functionality.
app/code/local/Iyngaran/HelloWorld/Block/HelloWorld.php
<?php
class Iyngaran_HelloWorld_Block_HelloWorld extends Mage_Core_Block_Template
{

    public function _prepareLayout()
    {
        $this->getLayout()->getBlock(‘breadcrumbs’)
        ->addCrumb('home', array('label'=>Mage::helper('catalogsearch')->__('Home'), 'title'=>Mage::helper('catalogsearch')->__('Go to Home Page'), 'link'=>Mage::getBaseUrl()))->addCrumb('customer',array('label'=>Mage::helper('customer')->__('Foo')));

        return parent::_prepareLayout();
    }

    public function myMessage(){
        return "I am Iyngaran, This is my module.";
    }

}
?>
Step Four
Here we create our template (phtml) file.
app/design/frontend/default/default/template/helloworld/helloworld.phtml
<div>
<?php
echo 'Hello World ! I am Iyngaran Iyathurai';

echo "<BR/>";

echo $this->myMessage();

?>
</div>
This just outputs some HTML and also runs the myMessage(); function from our block (HelloWorld.php).
Two caveats here. By placing our helloworld.phtml file in it’s location, we have created our own theme. You must make sure that
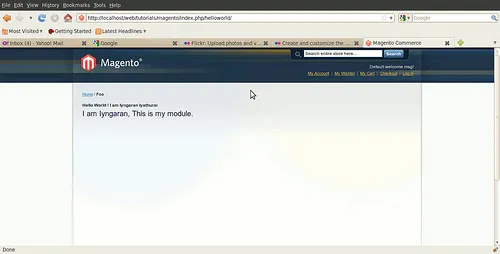
The new module is ready to run and hit browser with url
http://localhost/web/tutorials/magento/index.php/helloworld/ and see result.
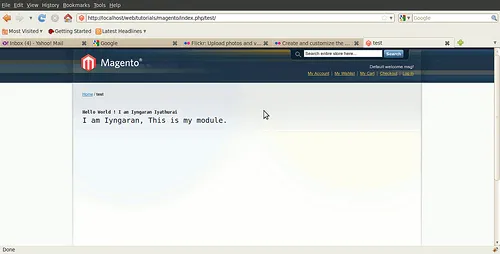
In a cms page, add this to your content:
{{block type="helloworld/helloworld" name="hello" template="helloworld/helloworld.phtml"}}
and see result.
Reference – http://www.magentocommerce.com/wiki/index/categories/[http://www.magentocommerce.com/wiki/index/categories/]